The “Device” pillar of zero trust generally requires that only devices with an authorized configuration are allowed to connect to a network. This blog post goes into how I planned to implement Palo Alto Networks’ Host Information Profiles (HIP) in an enterprise environment to enforce the “Device” pillar controls, the issues encountered, and how we were able to overcome them. Although this project was cancelled due to the “Device” pillar controls being implemented elsewhere in our technology stack, I’m publishing these notes and the associated script in case they are useful for others.
What is HIP and why implement it?
HIP controls allow you to mandate that a system has certain controls enabled, like running antivirus or disk encryption, before you allow a system to make certain network connections. For example, you might not want a system without data loss prevention (DLP) and disk encryption to access sensitive data. Or you might want to mandate that a system has an antivirus program with updated signatures running before the system connects to the Internet. This can also be beneficial for ensuring that all systems with internal network access have mandated minimum controls in place and for reducing risk, as attackers will sometimes attempt to disable protections like antivirus (AV) or endpoint detection and response (EDR), to lower the chance of being caught and stopped.
Palo Alto Networks’ (PAN) GlobalProtect agent supports collecting and building controls based on host information like the following:
- Operating System type and version
- Patch Management - Software installed and enabled, and how up to date
- Security Software - Antivirus, data loss prevention, EDR, and firewall installed and enabled
- Disk - Disk backup and disk encryption installed and enabled
- Certificates - Specific machine or user certificates installed
- Custom checks - Specific processes or registry keys
If a system is missing any of the required controls, you might choose to restrict it to only accessing a limited number of services, like those used for fetching AV signature updates, downloading patches, and other maintenance activities needed to bring the system back into compliance.
When I was researching HIP-based controls, I learned that Cisco ISE and other tools have supported similar functionality for many years. However, I’ve never implemented device-based controls with GlobalProtect or otherwise, so this was a fun foray into a new (to me) part of network security.
How do you implement HIP?
At a high level, implementing HIP consists of several steps, similar to implementing other network security controls:
- Defining requirements about which controls you want to mandate via HIP profiles
- Creating HIP Objects and Profiles to collect data and ensure that requiring the controls will not have any unexpected adverse impact
- Implementing the firewall policies that use the HIP profiles to control access
Let’s go through these one by one to understand what that might look like.
Defining HIP Requirements
This can be the most challenging step, as you’ll need to strike a balance between your optimal level of security, what controls would be overly burdensome to maintain, and what controls you should implement via other means. The more homogeneous your environment is, the easier this will be because you’ll need to define fewer requirements and therefore, need fewer Objects and simpler Profiles. For example, in a managed Windows environment, it is likely that every system uses the exact same disk encryption solution, like BitLocker.
Something to consider when writing your requirements is that they can significantly differ based on the type of device. For example, while you might generally mandate disk encryption to be enabled, as you think of your fleet of laptops and mobile devices, you might choose to waive that requirement for your virtual machines as unnecessary overhead.
You may also choose to lean on your other tooling. For example, Microsoft Defender on Android and iOS can detect if a system is rooted or jailbroken, so you might choose to implement your controls for those configurations with Microsoft Defender, instead of GlobalProtect.
Creating HIP Objects and Profiles
Before you can collect any HIP data, you need to have a GlobalProtect license and enable data collection in the GlobalProtect Portal. Then, your GlobalProtect Gateway will collect HIP data when your GP clients connect and periodically refresh it. If you want HIP data from Prisma Access to be sent to a Panorama, you’ll need to do additional configuration.
The HIP data collected will be matches for the HIP Objects and Profiles in your configuration. This data is collected even if the Objects and Profiles are not used anywhere. However, the GlobalProtect Gateway will only log matches - it won’t collect failures. What this means is that if we want to have visibility for both compliant and non-compliant hosts, we’ll need to have HIP profiles for both compliance and non-compliance. (Thank you to novakayne for sharing this approach with me.)
This leads to structuring our data collection as follows:
- Create Objects for each type of device.
- Create Objects for each control which will be required.
- Create Profiles for “non-compliant controls” with a negation of each Object.
- Create Profiles for “per-device compliance” which combine data from multiple Objects and Profiles to determine compliance for each type of device.
- Create Profiles for “non-compliant devices” which combine data from your “aggregated” profiles and checks for non-compliance. This is what you’ll be using in your ruleset.
The reason we structure our data collection like this is so that we have a clear way to determine where a failure exists and because we don’t want a combinatorial explosion of firewall objects.
Let’s expand this with an example. Let’s say our example network has Windows PCs, Androids, and iPhones, and we want to mandate disk encryption on all devices, no rooted or jailbroken mobile devices, and no malware on Android devices.
Note: The Objects and Profiles will be further refined below, so don’t create them yet!
First, our Objects for the device types:
Host_OS_Win11: General -> OS = Win11Host_OS_Android: General -> OS = AndroidHost_OS_iOS: General -> OS = iOS
Second, our per-control Objects:
Encrypt_PC: Disk Encryption -> Is Installed =Yes, Encrypted Locations =C:\Encrypt_Mobile: Mobile Device -> Disk Encryption =YesMobile_NoRootedJailbroken: Mobile Device -> Rooted/Jailbroken =NoMobile_Android_NoMalware: Mobile Device -> Has Malware =No
Third, our negated profiles for data collection of non-compliant controls:
NC_Encrypt_PC:not "Encrypt_PC"NC_Encrypt_Mobile:not "Encrypt_Mobile"NC_Mobile_NoRootedJailbroken:not "Mobile_NoRootedJailbroken"NC_Mobile_Android_NoMalware:not "Mobile_Android_NoMalware"
Fourth, our Profiles for “per-device compliance”:
Compliant_PC:"Host_OS_Win11" and "Encrypt_PC"Compliant_Android:"Encrypt_Mobile" and "Mobile_NoRootedJailbroken" and "Mobile_Android_NoMalware"Compliant_iOS:"Encrypt_Mobile" and "Mobile_NoRootedJailbroken"Compliant:"Compliant_PC" or "Compliant_Android" or "Compliant_iOS"
And finally, our Profile for non-compliance:
Non-Compliant:not "Compliant"
This wasn’t too bad, right? But like all good data collection, I was surprised by the results and had to refine them several times to work around some issues.
Gotchas for implementing Objects and Profiles
I initially tried to build out the HIP Objects from my knowledge of what was installed on the system, with poor results. But guess-and-check is slow, and there’s a shortcut: The GlobalProtect client on a Windows PC or Mac lets you see the complete HIP report. Using that to determine which HIP Objects are needed is much faster.
When creating the Disk Encryption Objects, you need to specify the encrypted locations. For a Windows PC, that’ll likely be C:\, and for macOS that could be Macintosh HD and Macintosh HD - Data.
Certain HIP attributes are only available on certain types of systems. For example, a check for “Rooted/Jailbroken” only applies to mobile devices. However, a Profile negating that object will also match Windows PCs. Therefore, you’d want to create your negation profile with the OS specified, so that it doesn’t generate useless logs. So with our example, NC_Mobile_NoRootedJailbroken would be defined as: ("Host_OS_Android" or "Host_OS_iOS") and not "Mobile_NoRootedJailbroken", so that you don’t log Profile matches from your Windows PCs.
As mentioned, you might choose to have different configurations even within a single type of device. For example, if your Windows PCs had naming conventions of Laptop-<ID> and Desktop-<ID>, you could create two Objects:
Host_OS_Win11-Laptop: General -> OS = Win11, Hostname containsLaptopHost_OS_Win11-Desktop: General -> OS = Win11, Hostname containsDesktop
However, you might also be less fortunate and not have a clear convention for both, but only one. For example, say you had a convention that your laptops were Laptop-<ID>, and your desktops were just <ID>. You could easily identify your laptops, but not your desktops. A solution you could use is to create three items:
- Object:
Host_OS_Win11-Laptop: General -> OS = Win11, Hostname containsLaptop- - Object:
Host_OS_Win11: General -> OS = Win11 - Profile:
Host_OS_Win11-Desktop:"Host_OS_Win11" and not "Host_OS_Win11-Laptop"
While this is kludgy, I could not come up with a better approach.
After tightening the profiles to avoid flooding ourselves with false positives of non-compliant logs, our final HIP Objects and Profiles look like the following:
First, our Objects for the device types:
Host_OS_Win11: General -> OS = Win11Host_OS_Android: General -> OS = AndroidHost_OS_iOS: General -> OS = iOS
Second, our per-control Objects:
Encrypt_PC: Disk Encryption -> Is Installed =Yes, Encrypted Locations =C:\Encrypt_Mobile: Mobile Device -> Disk Encryption =YesMobile_NoRootedJailbroken: Mobile Device -> Rooted/Jailbroken =NoMobile_Android_NoMalware: Mobile Device -> Has Malware =No
Third, our negated profiles for data collection of non-compliant controls:
NC_Encrypt_PC:"Host_OS_Win11" and not "Encrypt_PC"NC_Encrypt_Mobile:("Host_OS_Android" or "Host_OS_iOS") and not "Encrypt_Mobile"NC_Mobile_NoRootedJailbroken:("Host_OS_Android" or "Host_OS_iOS") and not "Mobile_NoRootedJailbroken"NC_Mobile_Android_NoMalware:"Host_OS_Android" and not "Mobile_Android_NoMalware"
Fourth, our Profiles for “per-device compliance”:
Compliant_PC:"Host_OS_Win11" and "Encrypt_PC"Compliant_Android:"Host_OS_Android" and "Encrypt_Mobile" and "Mobile_NoRootedJailbroken" and "Mobile_Android_NoMalware"Compliant_iOS:"Host_OS_iOS" and "Encrypt_Mobile" and "Mobile_NoRootedJailbroken"Compliant:"Compliant_PC" or "Compliant_Android" or "Compliant_iOS"
And finally, our Profile for non-compliance:
Non-Compliant:not "Compliant"
Analyzing the HIP data
With the HIP Objects and Profiles in place, I waited a few days to collect data, and then extracted the data from Splunk with a query like the following:
index=firewall sourcetype="hip"
| stats count by EndpointDeviceName, EndpointOSType, HipMatchType, HipMatchName
This Splunk query gave me a CSV with the HIP Object and Profile matches. I first analyzed it with Excel pivot tables, but as I had to refine the HIP Objects and Profiles multiple times, creating the same pivot table over and over got boring. So I created a Python script to generate an interactive HTML report:
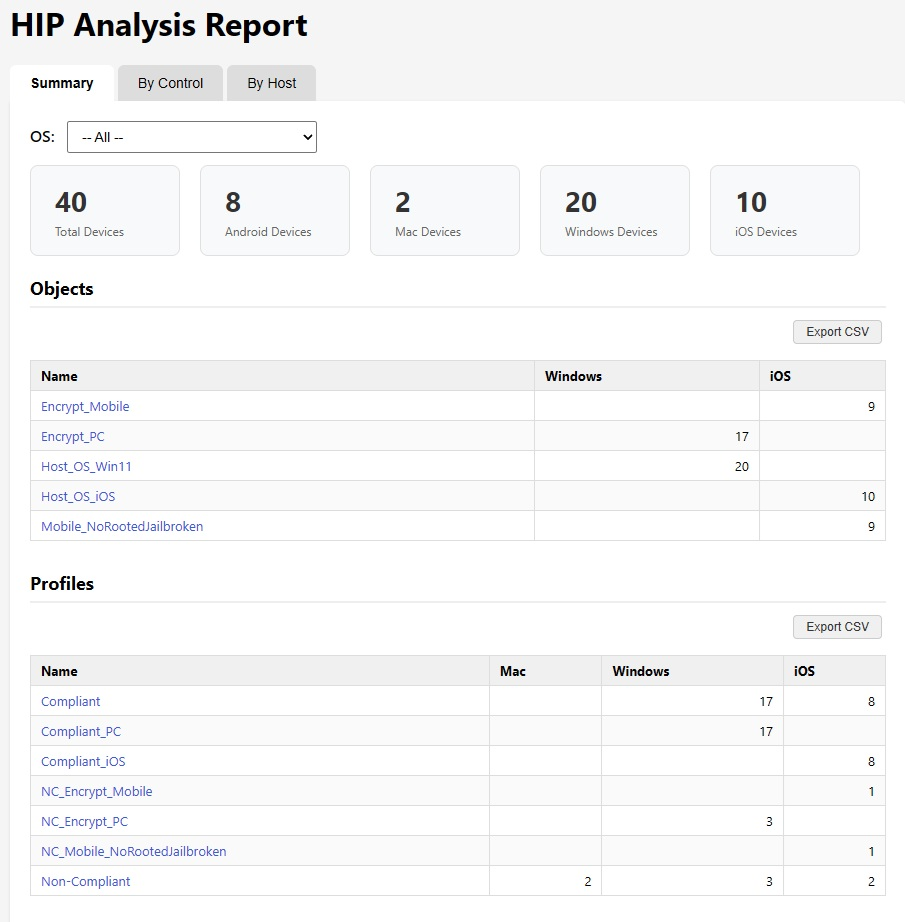
I then went through each device type, one at a time, to see how I’d need to tweak the Objects and Profiles to minimize the number of false positives. After several iterations and an extended duration of data collection to validate, and a discussion with the endpoint management team, I was ready to design the firewall rules for mandating HIP controls.
Designing HIP firewall rules
Our goal here is to create a firewall rule which matches traffic from the Non-Compliant HIP Profile in a security rule to block traffic from non-compliant hosts. However, above that rule, we’ll need to have a few other rules, because we want a way to bring our non-compliant hosts into compliance.
So our ruleset will need to be structured somewhat like the following:
- Allow rule for OS updates
- Allow rule for AV updates
- Allow rule for software updates
- Allow rule for EDR
- Allow rule for remote support
- …
- Block rule for non-compliant hosts
- Remaining rules in ruleset
You might also want to consider including a rule to allow access to your firewall management interface, in the event of a HIP configuration failure.
Of course, there’s another challenge: How will your users know that a HIP failure is the reason that they have limited network access?
PAN makes this possible with HIP Notifications. HIP Notifications let you define messages to be displayed to the user when a user matches (or fails to match) a HIP check. For more info, see the PAN documentation for HIP Notifications.
You may want to work with your helpdesk to craft the HIP Notification messages and ensure they’re ready to provide support to any users with issues.
After creating the allow rules, rather than immediately implementing the block rule, consider phasing in the block rule for non-compliant hosts one Active Directory group or subnet at a time, so that any issues uncovered only impact a small part of the enterprise.
Troubleshooting
Inevitably, there are going to be some bumps with implementing HIP-based controls. Why are hosts occasionally non-compliant? What HIP data is a client sending?
It’s possible to see the HIP data in the Panorama “Monitor” logs. You can also log into an individual firewall that the GlobalProtect client connects to and run the following commands to investigate the HIP configuration:
# Display the Computer name, user, and IP address
debug user-id dump hip-profile-database entry

# Display the Computer name, user, and IP address for client with IP 10.0.0.100
debug user-id dump hip-profile-database entry ip 10.0.0.100

# View GP Gateway's data for current connections
show global-protect-gateway current-user

# View GP Gateway's data for current connections (for usernames who start with the supplied prefix)
show global-protect-gateway current-user user "moshe"

# View HIP match logs
show log hip-match
I haven’t tested it, but if you need to get the HIP data for GlobalProtect hosts which connect to Prisma Access, but are managed by an on-prem Panorama, you’ll need to perform the additional steps from the PAN documentation.
Exception Policies
Every policy has its exception, and HIP policies are no different. Inevitably, there will be non-compliant machines which will need to be allowed to connect to your network and you’ll need to integrate those into your ruleset without it being overly burdensome.
The simpler approach for implementing exceptions is to modify your “Block rule for non-compliant hosts” by setting the source to include everything besides your excepted hosts. You can do this by creating an Address Group named “Excepted Hosts” and then setting the block rule’s Source Address to negated “Excepted Hosts”, so that it’ll match everything besides those hosts. If you wanted to limit the exception to a specific check, you’d need to create per-check block rules and Address Groups then set the negated address group there.
If your block rule was going to be limited to specific subnets, the simpler approach won’t work. Instead, you’ll need to take a less elegant approach, like using separate HIP objects for each host to be excepted:
- Create a HIP Object
Exempt_Host_HOSTNAMEusing General -> Host Name to match a specific exempted hostname. - Create a HIP Profile:
Exempt_Hostswith the value ofExempt_Host_HOSTNAME - Modify your
Non-Compliantprofile by appendingand not "Exempt_Hosts".
Your new Non-Compliant would then be: (not "Compliant") and (not "Exempt_Hosts").
For each additional host which needs to be exempted, create an additional HIP Object (e.g., Exempt_Host_HOSTNAME2), and append it to Exempt_Hosts with or "Exempt_Host_HOSTNAME2".
Conclusion
I had put off building HIP-based rules for a long time because I didn’t know where to start. However, the actual policy design was surprisingly easy - the hardest part was defining what “compliant” should mean. As the project was cancelled before the rollout completed, please keep in mind that the notes here are only from a partially implemented design, not a production deployment, and so it is possible I missed some details.
Further Reading
- NSA Cybersecurity Information Sheet: Advancing Zero Trust Maturity Throughout the Device Pillar
- NSA Zero Trust Implementation Guidelines: Device Pillar
- PAN: Configure HIP-Based Policy Enforcement
- PAN: Objects > GlobalProtect > HIP Profiles
- PAN: Leveraging Host Information Profile (HIP)
- PAN: HIP Notification Tab
- PAN: Set Up Access to the GlobalProtect Portal
- PAN: Policy Object: HIP Objects
- PAN: Configure HIP Redistribution in Prisma Access
- PAN: How to Troubleshoot HIP Data
- PAN: HIP Match Logs Are Not Generated When HIP Match Fails
- Microsoft Defender for Endpoint Mobile Threat Defense on Android and iOS
- Palo Alto: HIP Features - VPN, Host-Info and Firewall Security (UW-Madison Knowledge Base)
- Bypassing Host Security Checks on a Modern VPN Solution